Getting Started with Cisco Configuration Professional to Configure a ZBF
Cisco Configuration Professional is a Windows GUI application that network security administrators can use to deploy and manage multiple routers in a single environment. It can be used to configure and monitor Cisco routers without using the Cisco IOS Command Line Interface.
There are two versions currently available on the market –
Cisco Configuration Professional is the paid version that is used in mid-sized to larger environments this version offers smart wizards and advanced configuration support for LAN and WAN interfaces, Network Address Translation (NAT), stateful and application firewall policy, IPS, IPSec and SSL VPN, QoS, and Cisco Network Admission Control policy features. The firewall wizard also allows a single-step deployment of high, medium, or low firewall policy settings. This version can be used to organize and manage multiple routers at a single site.
Cisco Configuration Professional Express: is a Free single device manager for ISR generation 2 routers – the software is available on the flash of the router and used for bootstrapping and basic configurations, including –
- Basic configuration of router WAN and LAN interfaces
- Hostname, DNS, and DHCP configurations
- User Management for the router
- Dashboard, basic troubleshooting, and command line interface (CLI) tool
In this example, we will boot strap a Router (R1) with the basics, we will install CCP on a Windows workstation and use it to connect to R1. Using CCP we will then configure the Router as a ZBF (Zone Based Firewall). This lab has been setup using GNS3, and V2.8 of Cisco Configuration Professional.

Lets get started!
Boot Strap the Router
Step 1: Fire up the router, connect to it and configure the following:
#conf t – Enter global configuration mode.
#username admin privilege 15 secret cisco – create a new user “admin” with the highest privileges, create a password for the user for eg. “cisco”
#ip http server – enable http to be able to connect to the device using http
#ip http secure-server – enable https to be able to connect to the server using SSL
#ip http authentication local – use the local database to authenticate the user

Step 2: Configure the interfaces on the router as follows:
#int fa0/0 – Enter configuration mode for the interface
#ip address 192.168.5.254 255.255.255.0 – set the IP address of the interface – this will be the “Inside” interface
#no shut – bring up the interface
#int fa 0/1 – Enter configuration mode for the interface
#ip address 10.0.0.254 255.255.255.0 – set the IP address of the interface – this will be the “Outside” interface
#no shut –bring up the interface

Step 3: From the LAN PC use Ping to verify that the inside interface IP on “R1” is now up and reachable. This should be reachable.

Download and Install CCP
Step 1: Obtain Cisco Configuration Professional from Cisco’s website, and move the file onto the “LAN PC”. (you will need a CCO account to download the software).
Step 2: on the LAN PC double click the downloaded file to begin the installation


Step 3: Click “Next”

Step 4: Accept the agreement and click “Next”

Step 5: Leave the default location for the installation and click “Next”

Step 6: Click “Install”


Step 7: Tick the box, to create a shortcut on the desktop and click “Next”

Step 8: CCP will check for the minimum requirements, if anything fails you must go back and install the missing component. Click “Next”

Step 9: Tick “Run Cisco Configuration Professional” and Click “Finish”

The application will launch

Step 10: At the main screen click “Cancel” to close CCO sign in request

Step 11: At the Community window, insert the Inside IP address of “R1”, and the login details as created earlier. Tick “Connect Securely” and “Discover all devices”. Click “OK”

Step 12: At the Security Certificate Alert, select “Yes”

CCP will now load with the at the “Communities View” page. We can see that “R1” is now present as an added device.

Deploy ZBF wizard
Lets now turn this router into a ZBF, although this can be done in the CLI, its really quick and easy to use the wizard. It will save us a lot of time as the configuration includes a lot of lines.
Step 1: Navigate to “Configuration-Firewall-Firewall” click on “Create Firewall” tab, select “Advanced” and click “Launch the selected task”

Step 2: At the wizard click “Next”

Step 3: Select “FastEthernet0/0” as the “Inside(trusted)” interface, and “FastEthernet0/1” as the “Outside(untrusted)” interface. Click “Next”

Step 4: At the prompt to use CME (voice) functionality, select “No”

Step 5: At the warning prompt, click “OK” since we will be using the “Inside” interface to manage the router we should be in the clear.

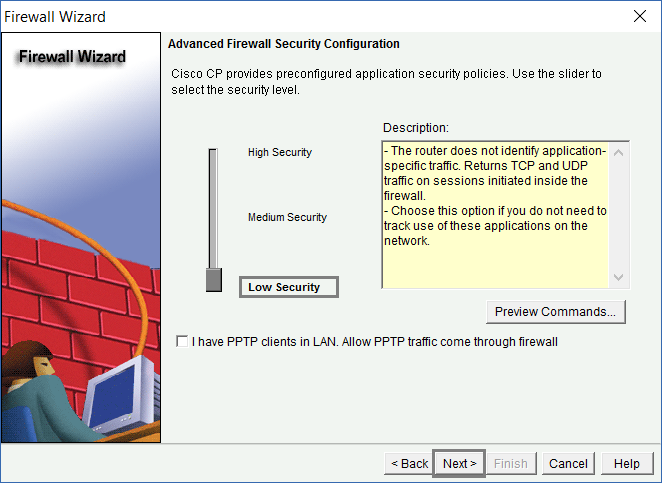
Step 6: Select “Low Security” and click “Next” (the policy can be modified later to customise and build the ZBF) for this example we will just stick to low security. You can preview the commands at this stage to see what will be deployed to the Router.

We can see here that there are over a hundred lines being deployed. Click “Close”

Step 7: Review the summary and click “Finish”

Step 8: Click “OK” at the informational prompt regarding voice traffic

Step 9: Click “Deliver” to send the commands to the Router, as an option you can tick “Save running config to the device’s startup config” basically after deploying the configuration save it!

Step 10: As the status bar completes, Click “OK”

At the confirmation that the configuration has been successful, click “OK”

Step 11: Now that the configuration has been deployed the Router is now acting as a ZBF, we can take a look at the configuration of the rule base by navigating to “Configure-Security-Firewall-Firewall” click on the “Edit Firewall policy” tab. From here on we can configure and manage the device using CCP. We can implement access policies, create new zones, create NAT policies and list goes on.


