Dynamic ARP Inspection (DAI) Concept/Attack Example and Implementation
Dynamic ARP Inspection is a security feature that rejects invalid and malicious ARP packets, by using DAI we can prevent ARP Poisoning/Spoofing Attacks.
The Address Resolution Protocol works the following way
“192.168.0.1” wants to communicate with “192.168.0.50” however the switch does not know how to reach the layer 3 address as switches only understands L2 addresses, in order to obtain the L2 address for the .50 it must send out a broadcast on the network asking .50 to respond with its MAC address.
The ARP frame is sent as a broadcast on the network using the source IP of “192.168.0.1”, the source MAC address is “78:45:c4:1f:57:0c”. The destination IP is “192.168.0.50” the destination MAC address is unknown,
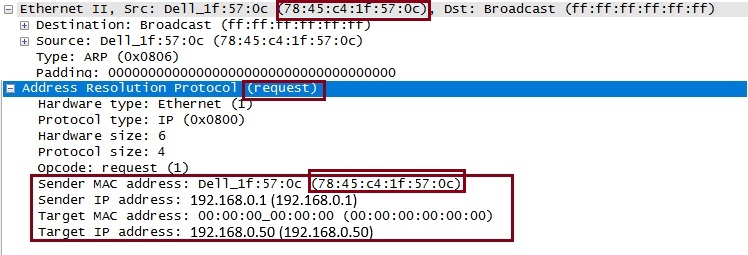
The ARP frame will reach all devices in the same broadcast domain and the device with the IP “192.168.0.50” will respond with a ARP reply and its MAC address.
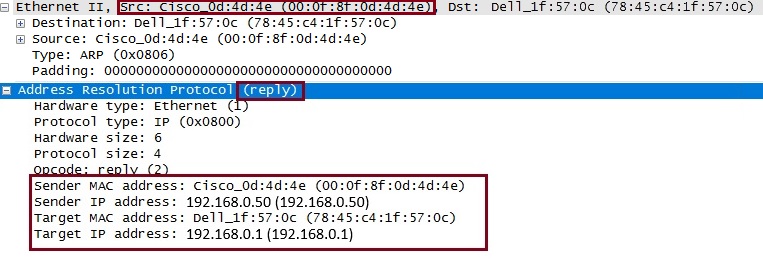
The reply says my source IP is “192.168.0.50”, here is my MAC address of “00:of:8f:0d:4d:4e”. The target IP is “192.168.0.1”, the target MAC address is “78:45:c4:1f:57:0c” that of the requester. The MAC address is then cached into the switches CAM table for a default of 300 seconds, if data is re-transmitted within this time the entry is updated with a new time-stamp, otherwise the entry is aged -out and the process of ARP will begin again if required later.
If everyone is playing by the rules, in the reply ARP frame – the sender MAC address “00:0f:8f:0d:4d:4e” should match the source Ethernet address and the target MAC address “78:45:c4:1f:57:0c” should match the source MAC address that was in the original ARP request.
Spoofing Attacks take place when the switch receives a “gratuitous” ARP – an ARP reply with a devices MAC address without a request from anybody.
For example –
Router has the MAC address A
Attacker has MAC address B
PC has a MAC of C
The router knows the PC’s MAC address and the PC knows the routers MAC address
The attacker sends a gratuitous ARP to the router and says my IP is that of the PC my MAC is actually B (as opposed to the real MAC of C)
If the router believes the request the router will think the MAC address for the PC is really B
At the same time the attacker can also send a gratuitous ARP to the PC saying I’m the routers IP address and the MAC of the router is B (when its actually A)
From there on the attackers MAC address B will receive all the packets from the PC and vice versa and the attacker will likely route the traffic to the real devices bi-directional.
it’s pretty easy to pull of an attack like this, so it’s a very good idea to take steps to mitigate this with dynamic ARP inspection.
Dynamic ARP inspection is an ingress security feature; it does not perform any egress checking, it is also supported on access ports, trunk ports, EtherChannel ports, and private VLAN ports. ARP Inspection is enabled globally, once enabled all ports become an untrusted port. What ARP Inspection will do is look at all the ARP traffic coming into the port and make sure it all matches up. ARP Inspection relies on the DHCP snooping binding table as a reference point to verify the mappings of what IP addresses belong to which MAC address and If it doesn’t believe a request it drops the packet.
As devices with static IPs won’t be part of the DHCP snooping table, we would need to manually create an ARP ACL to allow these devices to send ARP replies. The switch first compares ARP packets to user-configured ARP ACLs. If the ARP ACL denies the ARP packet, the switch also denies the packet even if a valid binding exists in the database populated by DHCP snooping.
we can say MAC xyz is for IP 192.x.x.x so when ARP inspection is done at the port it will be successful.
We can also set a port that has a device with a static IP as a “Trusted” port, this will allow ARP messages to come in as they want, most of the time we would set all the “Trunk” ports between switches as a trusted port to allow ARP messages to traverse to other switches.
on untrusted ports by default there is a rate limit of 15pps for ARP messages, to prevent other types of attacks like a ping sweep. Any violations on an untrusted port will put the port into err-disabled state.
ARP Poisoning Attack Example:
In this example we will take a look at how simple it is to carry out an ARP spoofing attack. If you are replicating this – make sure this is done so in a lab environment and you have permission beforehand. The lab below was created using GNS 3, with “KALI Linux” running on VMware WS connected to port “e0/2”, in this example we will send gratuitous ARP frames from the “Attackers” machine into the switch and over to PC1, we will inform PC 1 that the MAC address for the “Internet Router” is not what it has in its ARP cache but the MAC address we are presenting (which will the MAC address of the attacker’s machine), this will poison the ARP cache and PC1 will believe the new presented MAC address.
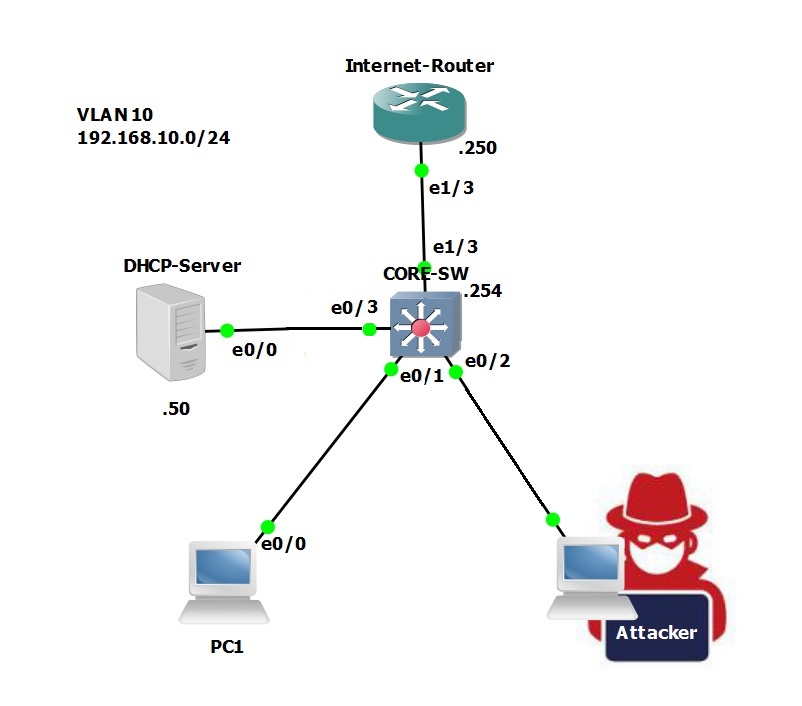
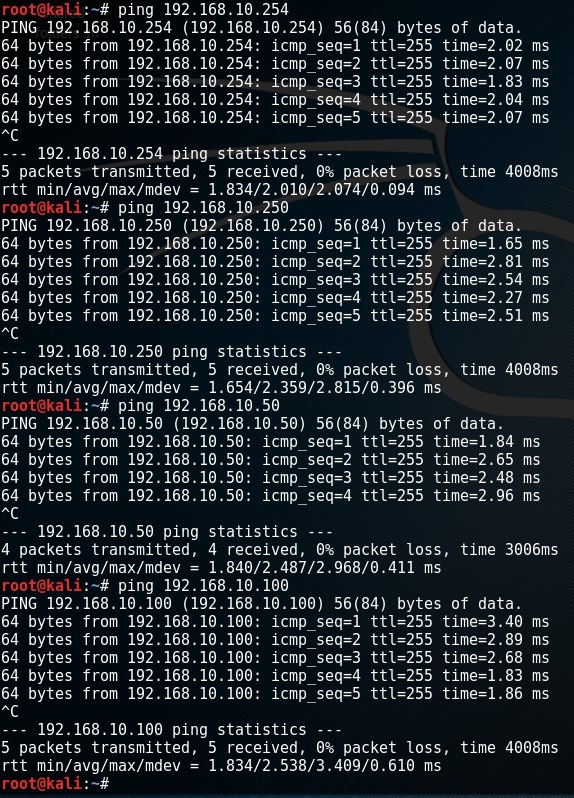
Step 1. From the “Kali Linux” box, let’s make sure we have network connectivity and that we can reach all the devices in VLAN 10.
Ping is successful which indicates our network has basic connectivity between all the devices.
Step 2. Let makes sure that PC1 has a valid IP address from DHCP and the interface up.

Step 3. From PC1 lets ping the “Internet Router” and get it cached into its ARP table,
#ping 192.168.10.250
#show arp
We can see from the output below that ARP has resolved the MAC address of the “Internet Router” which is “aabb.cc00.0831”

Step 4. On the “Kali Linux” box lets send in some gratuitous ARP frames
#arpspoof –I eth0 –t 192.168.10.100 192.168.10.250
The command is saying – run a continuous ARP spoofing reply through interface “eth0” of the “Kali Linux” machine to the IP “192.168.10.100” claiming the MAC address of “192.168.10.250” is that of “eth0” (Linux Machine)
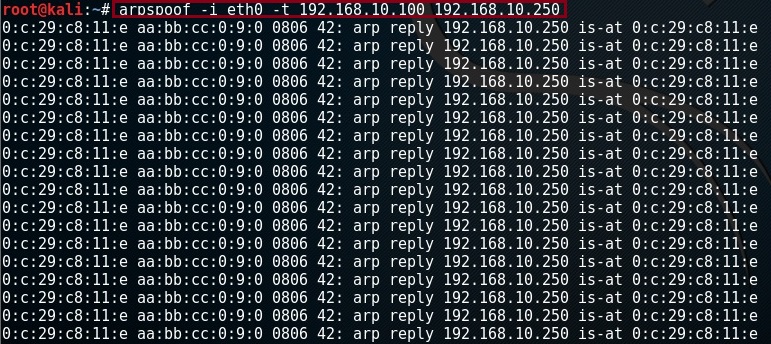
Step 5. On the PC, lets take a look at the ARP cache,
#show arp
We can see that the ARP entry for the “Internet Router” has now changed and according to the PC the IP address “192.168.10.100” now has a Mac address of “000c.29c8.110e” which is the “Kali Linux” machine.

Step 6. Stop the attack form the Kali Linux box with a “Ctrl C” and wait for the ARP cache to age out. On the PC1 perform another ping to “192.168.10.250” then have a look at the ARP cache again,
#show arp
The entry should now show the original MAC address of the “Internet Router” as the attack has stopped and the device was able to resolve the L2 address by completing an normal ARP request.

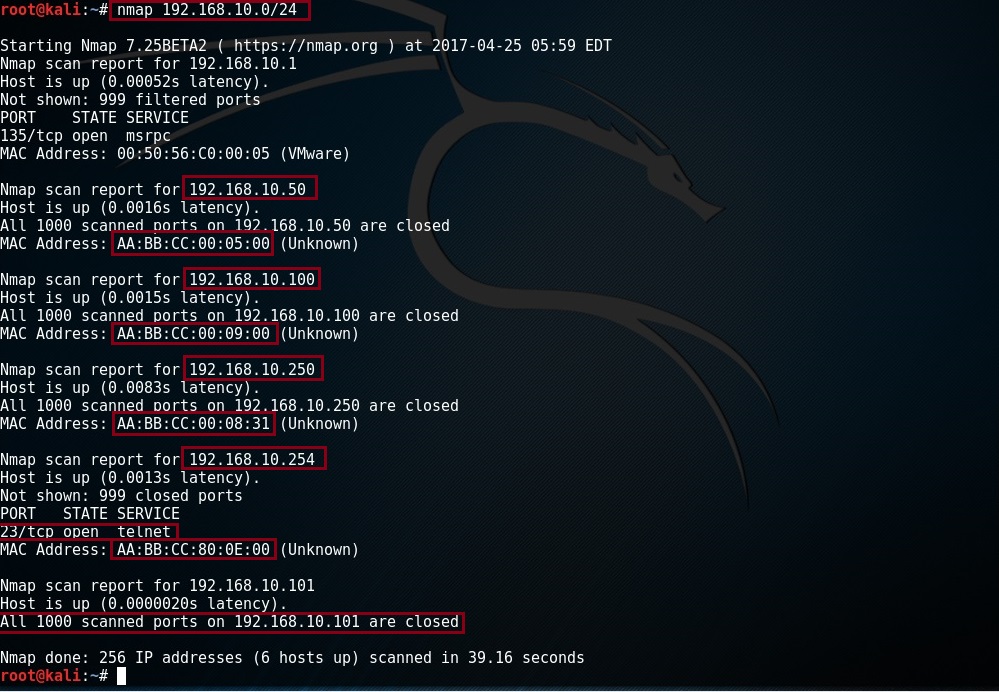
Step 7. As an additional step lets perform a ping sweep to see how the “Kali Linux” box is able to scan a subnet to retrieve IP and MAC address information as well as port information.
On the “Kali” box use the following:
#nmap 192.168.10.0/24
From the output below we can see a lot of information regarding this subnet, the application also reports any ports that may be open so an attacker could use this information against you.
Let’s configure DAI to prevent ARP related attacks and put a rate limit on the ports to make sure ping sweeps are not possible.
Configuration Example:
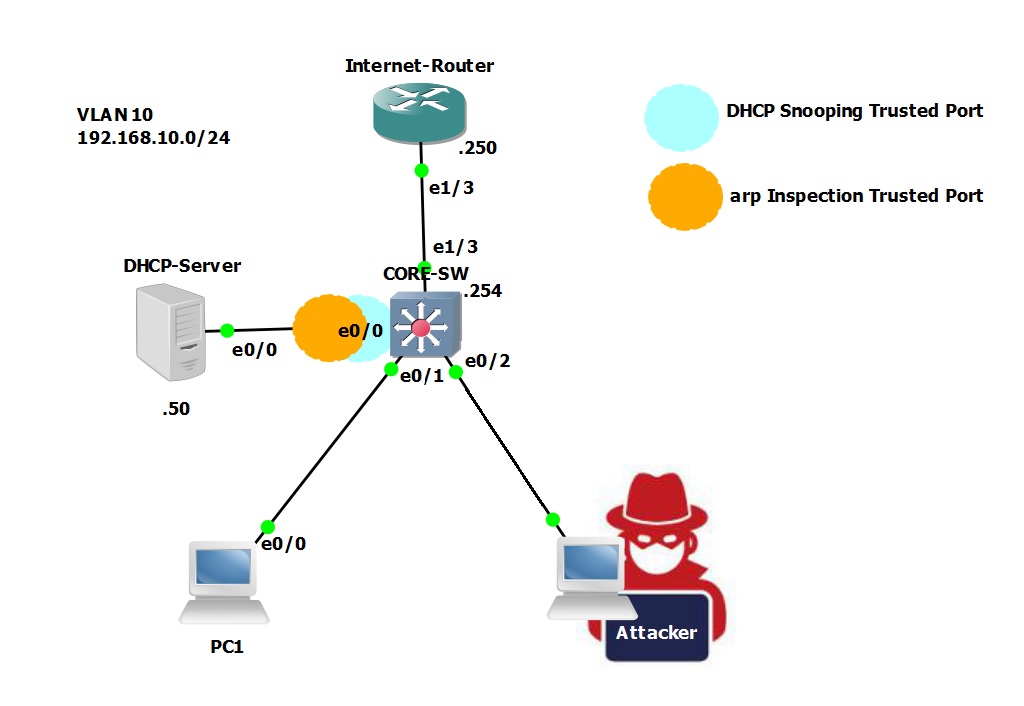
In this step-by-step guide building on the topology used earlier using GNS3 we will implement DAI on the “CORE-SW”. We will configure “E0/0” as a trusted port and then we will configure an ARP ACL for the “Internet Router” that has a static IP Address to allow the ARP replies.
Using “Kali Linux” we will then perform an “ARP spoofing” attack to see how DAI behaves now that we have taken steps to mitigate the attack. The lab has the basic network connectivity required and DHCP snooping has been enabled.
Complete LAB Configuration can be downloaded here –
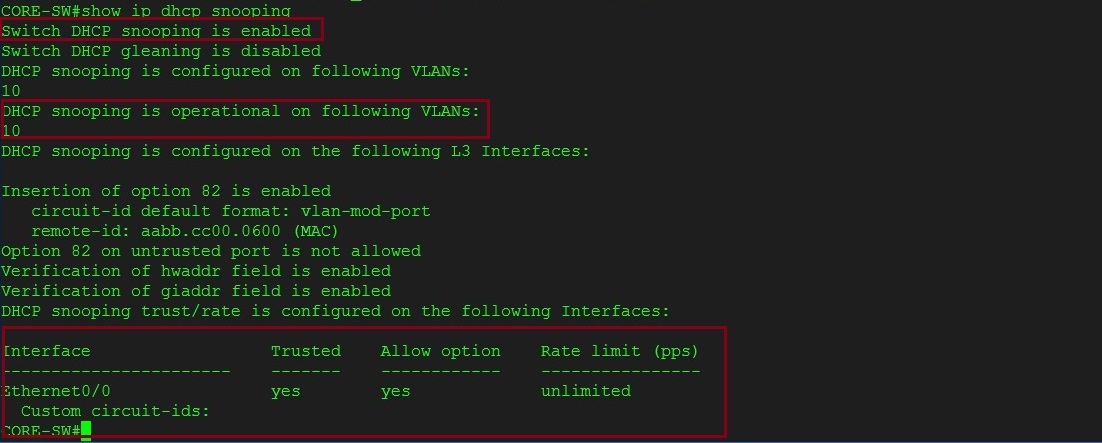
Setp 1. On the “CORE-SW” lets validate IP DHCP Snooping is enabled.
#show ip dhcp snooping
from the ouput below we can see that dhcp snooping is enabled globally, ip dhcp snooping is operational on VLAN 10 and interface “e0/0” is a trusted port which will allow DHCP server messages through as the real DHCP server is connected on this port.
Step 2. Let’s check the snooping binding table –
#show ip dhcp snooping binding
We can see that there are two entries in the table, the first ending with “0E” is the “Kali Linux” machine attached to “ethernet0/2” in VLAN 10, the second ending with “00” is the user PC1 connected on port “ethernet0/1”. DHCP has issued both machines an IP and recorded the L2 and L3 address in the snooping table. ARP Inspection will use this information to ensure the addresses match.

Step 3. Turn on Dynamic ARP Inspection
#ip arp inspection vlan 10
All ports in VLAN 10 are now untrusted from a DAI perspective

Step 4.
#show ip arp inspection vlan 10
From the output below we can see that dynamic ARP inspection is now enabled for VLAN 10

Step 5. From the core switch lets attempt to ping the “Internet Router” at .250, we can see that the ARP replies are being dropped by the switch on port “E1/3” where the “Internet Router” is connected to, this is because “E1/3” is currently an untrusted port and any ARP replies that come in from this port will be dropped, also the address of the “Internet Router” is not listed in the DHCP snooping table.

Step 6. Let’s create an access-list to manually add the IP and MAC of the “Internet Router” to allow the ARP replies.
#Conf t
#arp access-list ARP-ACL-01
#permit ip host 192.168.10.250 mac host 000c.29c8.110e
#do show arp access-list

Step 7. Apply the ARP ACL
#ip arp inspection filter ARP-ACL-01 vlan 10
![]()
Step 8. Validate the ACL has been applied
#show ip arp inspection vlan 10
We can see that the “ARP-ACL-01” has been applied

Step 9. Ping should now work as the ARP replies are now allowed from that MAC address, and is matching the ACL we created.

we can also see that an ACL has been matched by checking the “ARP inspection statistics”
#show ip arp inspection statistics

Step 10. From the switch lets attempt to ping the DHCP server at .50, we can see that the switch once again is dropping the ARP replies as the port “E0/0” is not a trusted port.
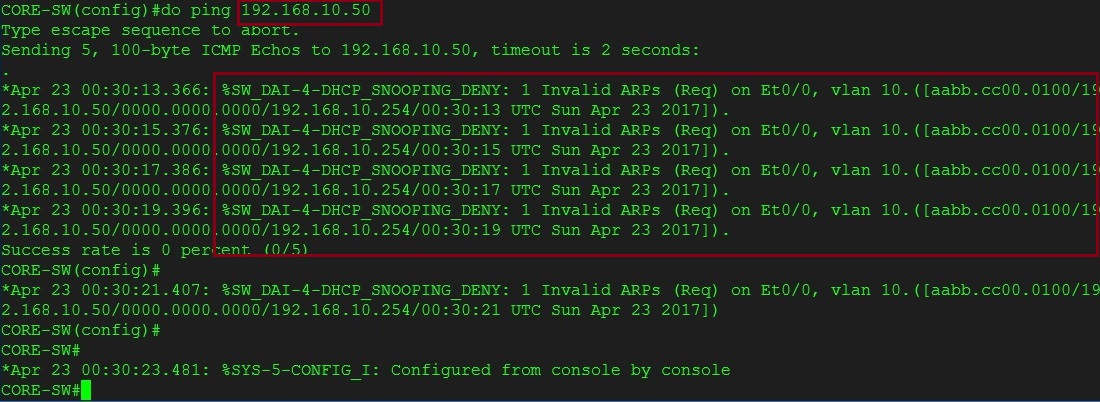
Step 11. We can trust the port that is connected directly to the DHCP server to prevent the ARP traffic being inspected.
#int e0/0
#ip arp inspection trust

Step 12. Ping should now work as the ARP replies are no longer being inspected.

Step 13. To increase security and prevent ping sweeps being performed let’s configure both the user ports with a rate limit on ARP packets. The default violation will put the port into “err-disabled” state.
#int e0/1
#ip arp inspection limit rate 10
#int e0/2
#ip arp inspection limit rate 10

Step 14. On the “CORE-SW” verify the DHCP snooping table the correct MAC address for the “Kali Linux” machine
#show ip dhcp snooping binding

On the “Kali Linux” machine verify its interface MAC address.

From the Kali Linux machine verify connectivity by pinging the “CORE-SW” and the “Internet Router”

On the user PC1 verify the IP address
#show ip int brief

Step 15. From the “Kali Linux” machine launch the ARP spoofing attack
#arpspoof –t eth0 192.168.10.102 192.168.10.254
The above command is saying – run a continuous ARP spoofing reply through interface “eth0” of the “Kali Linux” machine to the IP “192.168.10.102” claiming the MAC address of “192.168.10.250” is that of “eth0” (Linux Machine)

We see instantly on the “CORE-SW” the traffic is being dropped on interface “E0/2”where the “Kali Linux” machine is connected to. This is what we want, the attacker would not be able to poison the ARP cache as DAI is now doing its job.
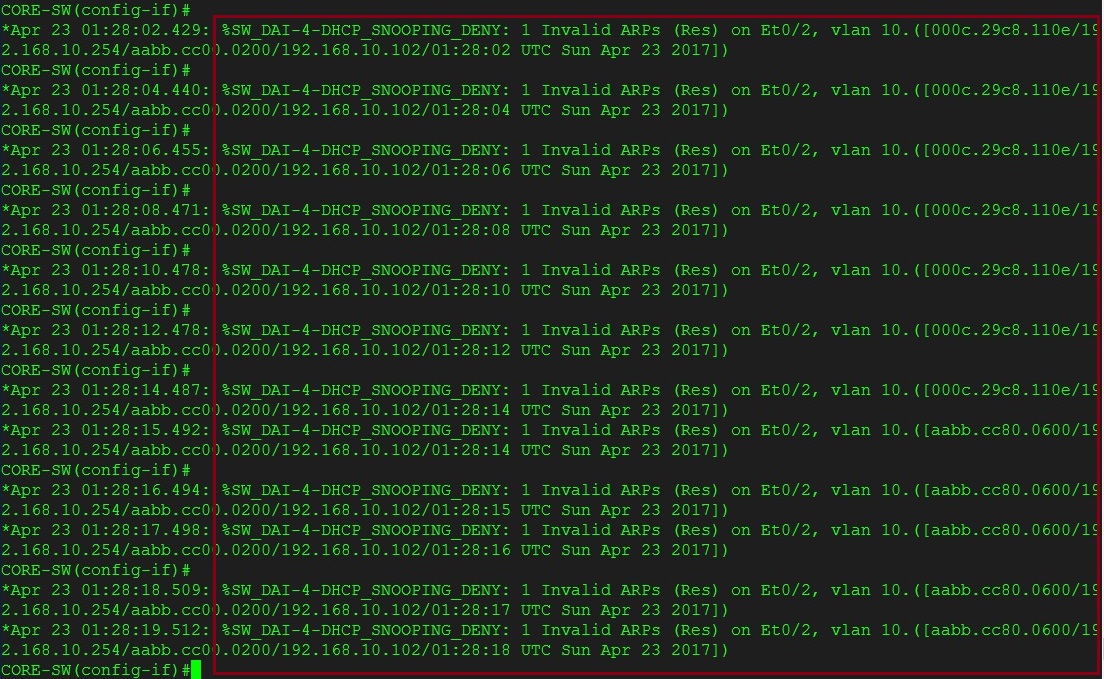
Step 16. On the “Kali Linux” machine let’s try and run a ping sweep,
#nmap 192.168.10.0/24

On the switch we can see the ARP requests flooded the port at more than 10 packets per second and therefore a violation occurred which “err-disabled” the port.

#show interface status err-disabled

Step 17. In a large organisation you may want enable auto recovery of the ports to reduce the administration overhead, to do this we simply set the port to recover after 30 seconds.
#conf t
#errdisable recover cause arp-inspection
#errdisable recovery interval 30

