Install Certificate Services on Windows Server 2022
A Certificate Authority is an entity that stores, signs and issues digital certificates. A digital certificate certifies the ownership of a public key by the named subject of the certificate. This allows others to rely upon signatures made about the private key that corresponds to the certified public key.
Microsoft’s Certification Authority is based on Public Key Infrastructure. The Active Directory Certificate Services role can be deployed on most Windows Server operating systems and provides the ability to act as an Enterprise or Standalone Root CA.
Using a Windows Root CA server is very useful for many applications, for example – if deploying 802.1x with certificate-based authentication or EAP-TLS for Wireless 802.1x, a Windows Server provides the ability to enrol and automatically distribute certificates to endpoints with ease through Microsoft Group Policy.
A CA Server can also be used to sign certificates for Servers, Network and Security Devices within an internal organisation. Certificate based authentication is considered one of the most secure methods as its uses public key and private key to encrypt and decrypt data.
In this basic step-by-step guide, we will install the Active Directory Certificate Services role and configure it.
A fresh new virtual instance of Windows Server 2022 has been installed, this server has been renamed, basic networking has been configured and it has been joined to the Active Directory Domain.
Let’s get started!
Install the Certification Authority Server Role
1. Login to Windows Server 2022 and launch “Server Manager”

2. Click the “Manage” button select “Add roles and features”

3. At the Wizard click “Next”

4. Select “Role-Based or Feature-based installation” and click “Next”

5. Click “Select a server from a server pool” and highlight the current server, click “Next”

6. Tick the “Active Directory Certificate Services” box, a new Window will pop up click “Add Features”


7. Click “Next”

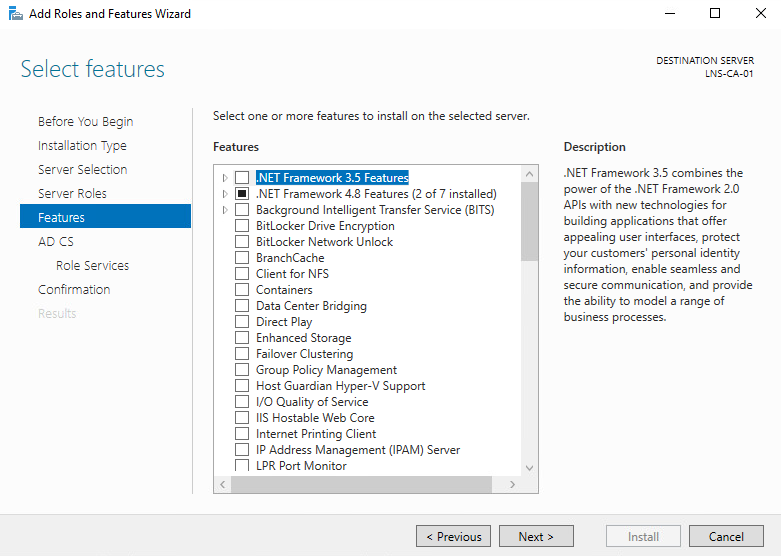
8. At the features window, click “Next” we are not installing any additional features

9. Read of the role description and, note the tasks that cannot be performed once the CA role is installed. click “Next”

10. From the role services list select “Certification Authority” and “Certification authority Web Enrollment”

Click “Add Features” at the popup for IIS installation

11. Click “Next”

12. Click “Next”

13. Click “Next”

14. Select the “Restart the destination server automatically if required” tick box. This will allow the server to restart automatically if a reboot is required at the end of the install. Finally click “Install”

15. Once the role is installed, click “Close”

Configure the Role
1. From Server Manager click on the yellow warning message, select “Configure Active Directory Certificate Services on this Server”

2. At the configuration wizard click “change”

3. Provide the Domain Admin user account credentials and click “OK”

4. Note the change in the “Credentials” window, click “Next”

5. Tick both role services and click “Next”

6. Select “Enterprise CA” and click “Next”

7. Select “Root CA” and click “Next”

8. Select “Create a new private key” and click “Next”

9. Leave the default values for the private key information and click “Next”

10. Specify the common name for the CA or leave as default. Click “Next”

11. Specify the CA Certificate default validity period, this is set to 5 years by default, this can be changed if required, Click “Next”

12. leave the default location of storing the database files and click “Next”

13. Review the configuration and click “Configure”

14. Once configuration has successfully completed, click “Close”

Configure IIS
By default, IIS does not have HTTPS enabled for the web enrollment service, we need to allow HTTPS connections and define a certificate for the service to use. HTTP connections will work, however in the event the CA server is being accessed from another source to request a certificate, the credentials will be sent over in clear text. It’s important we modify this to use SSL.
1. Click “Start” and type “IIS Manager”

2. Expand “Server Name” – “Sites”, right click “Default Web Site” and select “Edit Bindings”

3. Click “Add”

4. Select “https” then from the “SSL Certificate” drop down menu, Select the Server certificate that should have been generated automatically by the CA, in this case it’s the “LNS-LNS-CA-01-CA”.
If for any reason this certificate is not yet present, one can be generated by selecting “Create a Self-Signed” Certificate” from the right-hand pane within IIS.
Click “View” to check the contents of the certificate, then click “OK, and “OK” to save the changes and return to the IIS window.


5. From the right-hand pane within IIS, select “Browse*:443 (https)”

6. The browser will launch with “https://localhost/certsrv” in the address field. Click “Continue”

From the web interface, we can start requesting certificates from the CA for our organisation. To access this portal from other devices, you can navigate to “https://IP Address or DNS name/certsrv”

